How to make full SEO settings on the Blogger website|Hello friends, my name is Haider Ali Hamza Today, in this article tell me how to combine your BLOGGER and make it Setting A to Z and you can slap your blogger into a beautiful website, so without Time Waste Go to Topic
We start the blogger's engagement with an introduction so that you can easily understand...
INTRODUCTION TO BLOGGING
What Is Blogging? Blogging is a way of sharing your thoughts, opinions, facts on the internet for the benefit of other internet users. Previously, blogging used to be a platform where one shares his experiences, daily activities and so on with others. But, at this age, blogging is way more than that. You can do your business at home via blogging and get along with your prospects.
Is Blog Different From Website? A lot of people are still confused about this. Mainly because some organizations use both. But, there are some features that differentiate blogs from the website.
1). Blogs are updated frequently at worst, weekly. Whether it be a book review blog reviewing books, health blog sharing healthy articles or business providing updates to its services regularly.
2). A blog allows for reader engagement. There are
section for readers to comment.
YOU DONT HAVE A BUSINESS, HOW DO YOU CHOOSE YOUR NICHE/AREA OF BLOGGING? Have been expecting this question. If you don't presently have a business you want to blog on, there are some areas you can. There are various niches in the blogging industry, mean..there are gazillions! Niches are; Entertainment, Health, Personal development, Book review, Technology, Education, etc. Some of these niches to have sub-niches. If you are a nurse, a health niche is preferable. If you love reading novels, you will do well on the book review blog and the list goes on. (Read how to select your blogging niche here) before you continue. Now that you know what Blogging is, Why you need to blog, How to choose your niche, let's push on to the step by step creation of a blog on Blogspot.

How To Sign Up On Blogger
Have you read what blogging is? Why you need to
blog? How to choose your blogging niche? What you
need? oh..good! Let's move on.
Do you have a gmail account? If No, quickly sign up
here www.gmail.com
Signing up on Blogger: Open your browser, either on
laptop or phone and go to www.blogger.com. You
should see this==>
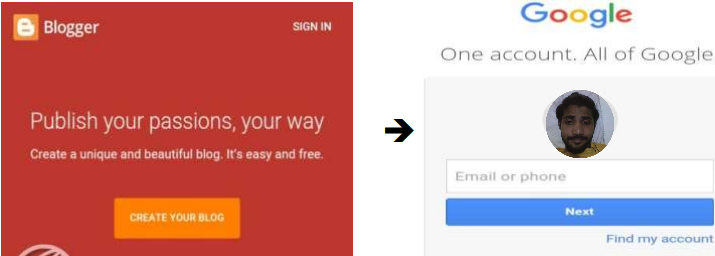
Enter your Gmail, click next, then enter your password.
If these steps are done successfully, you will see your
dashboard.
Choosing a domain name: After seeing your dashboard,
you will be prompted to choose what your domain
name will be. Also, note that the domain name
represents you and what your blog stands for.
The normal free domain on blog spot is e.g
example.blogspot.com. Where the example may
mean any name you choose for your blog.
Warning: While choosing your blog address, make it
as short as possible and easy to remember. If I want to use custom domain later? Good!
In chapter five, I shall discuss how to use the custom
domain with your blog. Click to read THE BENEFITS
OF HAVING CUSTOM DOMAIN.
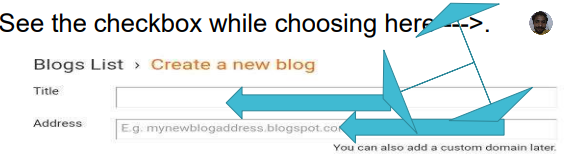
The engine will notify you in case your domain has
already been taken.
Choosing Template: Now after you have chosen and
activated your domain, the next step is choosing of
Template. What template does is that it shows how
your blog layout will look, both on desktop and
mobile devices. The template is the word in Blogger,
while it is Theme in Wordpress. Apart from blogger`s
own template, you can also buy the premium
templates or download its free version for free.
Also, there are some free templates you don`t need
to pay for. To get these templates, either free or
paid. Go to www.gooyabitemplate.com and choose
it according to the niche. I have also some
templates with me. Contact me if you care.
Why Do I Need a custom template? Well, you will need it now or later. The custom/paid template offers more feature and support compared to the free version. It is for the beautification of your blog, makes navigation of your blog easy for your visitors, it helps in the way you display adverts and banners, and helps in adding more features to your blog. If you feel you don’t need a third-party template, then choose one from the templates that show after choosing and setting up your blog address/domain.
Understanding Template Customization
How To Install Custom Templates: After you must
have downloaded your preferred template, the next
thing is to install it. If you would not like to use them
natural templates provided by blogger itself, How to do
you install?
Remember, the downloaded template is in zip format?
Good. You can’t install a zip file on blogger, you have to
unzip it.
Here is how.
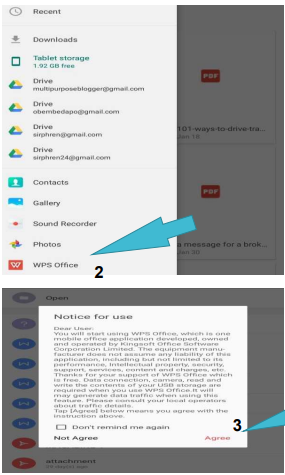
1). Download WPS on your google play store. It looks
like this--> And install on your android device
2). After downloading the template, open it with the
WPS. When you open, it will show the unzip (XML)
form of the file. (IF THE? IS NOT THERE, YOU HAVE
NOT UNZIPPED)
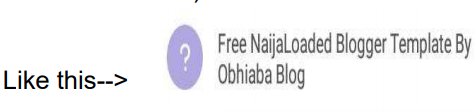
That means you have successfully unzipped it.
Now, let's go to installation. If you already have a
blog and you want to change your template, make
sure you first back up your blog in case something
goes wrong.
How To Backup: To back up your blog, log in to your dashboard => Go to theme Click on Backup/Restore at the top righthand corner like this
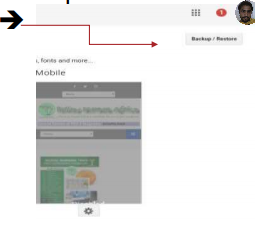
When you click on it, it will show this,
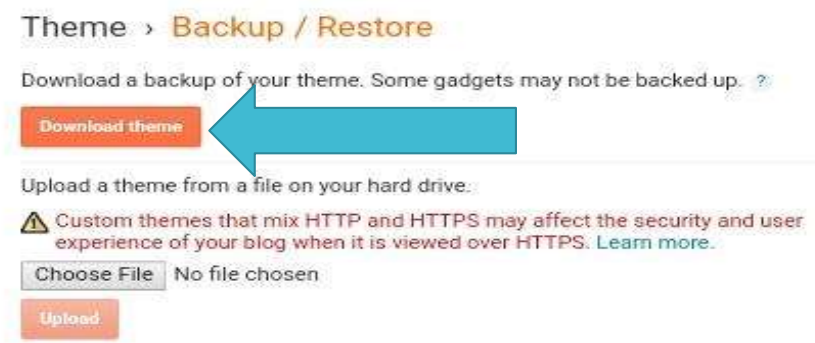
Now click Download theme. After finishing
downloading, you have successfully backed up your
blog.
CHAPTER TWO
BLOGGING MADE EASY FOR BEGINNERS ON BLOGSPOT
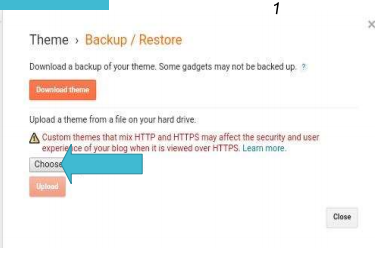
To install the new template, click on choose file(you can
do this on your phone) it will take you to your phone
document gallery. After choosing the file, click on
upload and wait for it to change automatically. If it's
successful, you will see a change in your blog view. If
it's not, try it again. Well done! Let's keep going.
Now view your blog to see how it looks.
How to Apply Google Adsense Approval for Blog
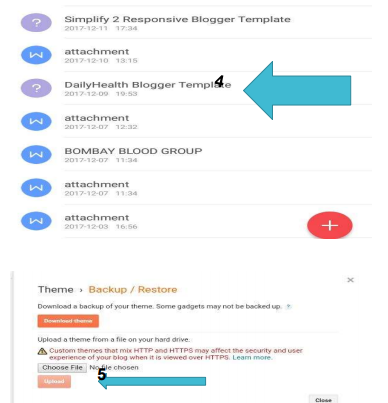
Follow the 5 steps to install template with your Android device
Editing Template (HOW TO): In this section, you will learn how to change the way your blog looks. That is the background, fonts, headings color and width. And how to add codes to your template. There is the reason you may need to edit your template. 1). To add widget codes such as related post, sharing widgets, follow us at social networks widget, and so many.
TIP! You can only edit your template/HTML using your laptop or desktop devices.
HOW TO EDIT TEMPLATE
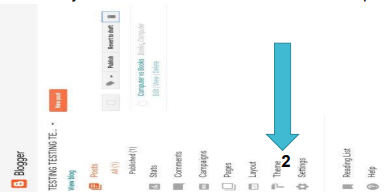
1Go to your dashboard2 Click on theme/template
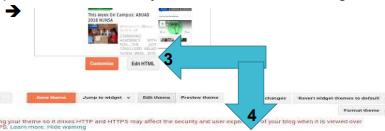
In the opening page, click on Edit HTML and wait for it
to open. When it does, you should see something like
this
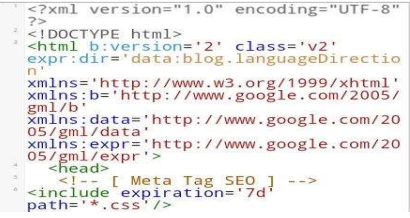
You can see millions of stuff in there....don’t you
worry...it is easy.
Remember to always backup your blog before doing
anything!
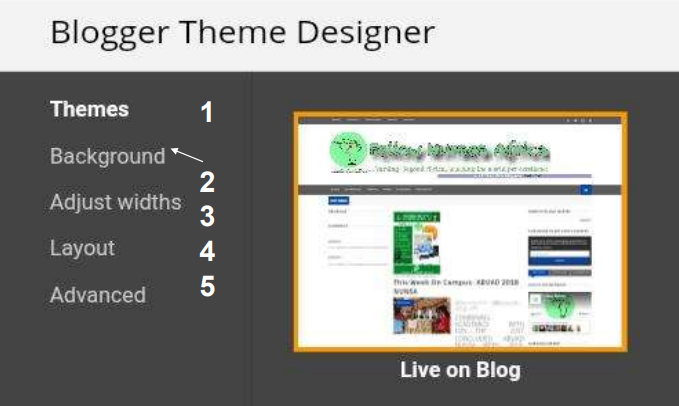
To edit: Search for any code or section by searching for it by pressing CTRL+F, it will bring a section where you can type what you are looking e.g and click enter on your keyboard and it will take you directly to where you want on the HTML. After that, you can add whatever code where you are instructed to add. Usually before or after them, etc. It is as simple as that. Template Layout: Your template/blog layout is how you want the whole blog looks and feels. Based on your choice of template, your layout can have; Right and Left sidebars, Footer sections, footer column and so on. Remember you must make your blog easy for navigation. To make changes to your layout, Go to your dashboardThemeCustomize. When you get to the customization zone, you should see this
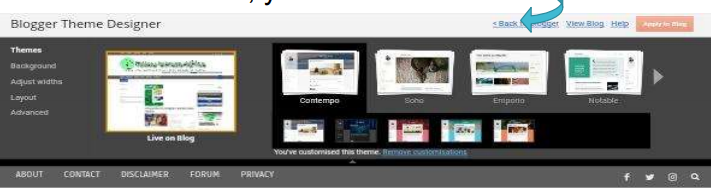
Sections are; Theme, Background, Adjust the width, Layout and Advance(This is used for adding CSS code. So, if you want to add any CSS code, go to this place and add and see it take effect). When you open, you are already on the theme, so, you don’t need to add that again. Whatever changes you are making will be displayed below the bar for you to preview. If you like it, you can leave it or change it. Remember to click Apply To Blog
Understanding Blog Settings: The settings in the blog include;
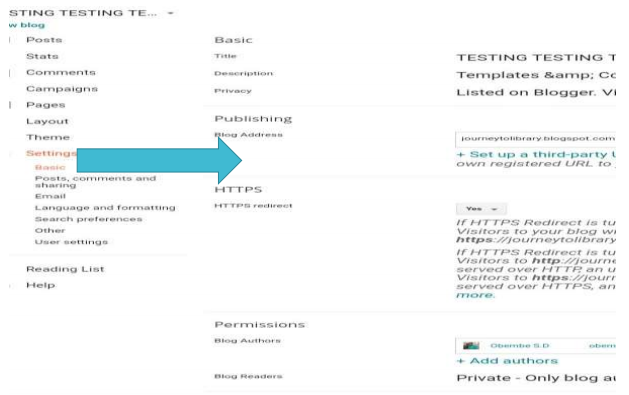
Basic: This include Title, Description, Privacy, Address, Https, etc.
Blog Title: This is where you put your blog's title in
Description: What is your blog about?
Privacy: You can decide to make your blog searchable by a search engine or not
Address: At this section, you can change your blog address. Advisable if you have not made it public.
HTTP: Previous, blogger do not activate https security for a custom domain. But now they do. Set your blog to https and also redirect it to https to make it secured for your visitors
Authors: This area is meant for inviting authors to your blog. When you want to invite, click on Add authors, enter their Gmail and send the invitation.
Why SEO is clearly crucial in your business
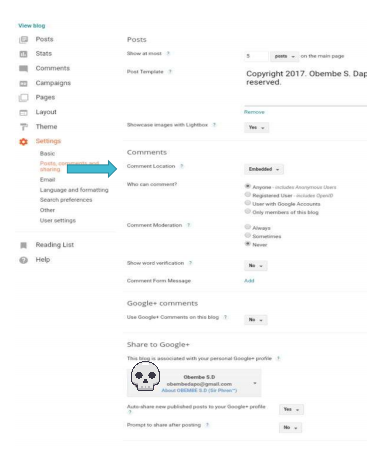
When they accept the invitation, it will reflect. Then you can select their roles as either authors or admins. CHAPTER THREE BLOGGING MADE EASY FOR BEGINNERS ON BLOGSPOTPost, Comment, and Sharing: This section includes numbers of the post to display, Comments which is usually set to embed so that others can reply to any comment. Who can comment? (set it based on how you want it), Comment moderation(if you wish you may set it to never or always in other to check spam), Google+ comments, you can only use it if you using G+ profile. CLICK ON THE? IN FRONT OF THE SUBSECTIONS TO LEARN MORE.
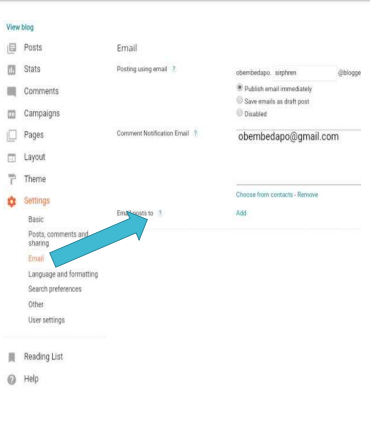
Email: In this section, you will specify whether you want to publish via email or not. Also, set the email with which you want to receive a notification.
Language and Formatting: This section helps you in choosing the language type with which you want to write. Plus, setting up your time zone and date format.
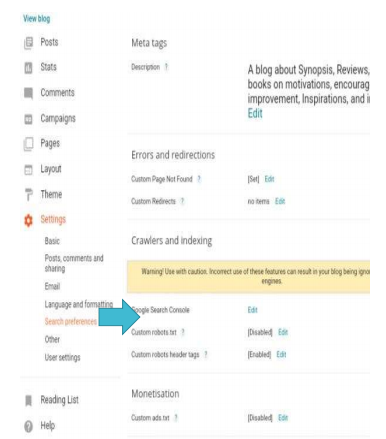
Search preference: This area includes your blog meta description (what your blog is all about), Error pages, Google search console, and monetization. Which we all be dealt with later on.
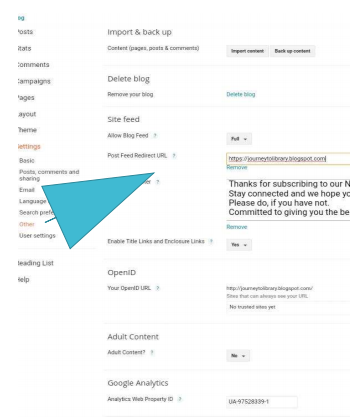
Other: Here you can import and backup your blog contents, delete, Blog feed and Google analytics.
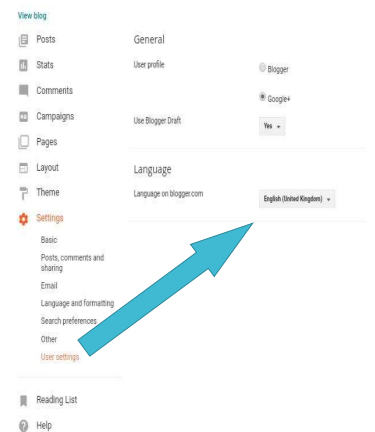
User setting: Here you can set your profile as either Blogger or Google+. Make sure you edit whichever one you choose. The benefit of a G+ profile is that your posts are automatically shared on G+ as soon as you publish them.
How to Fix 500 Internal Server Error?
Understanding Widgets: Widgets are codes you
place in your blogger gadgets. The codes are usually
from coding gurus to help perform some kind of
function in your blog. Some blogger trickster referred to
it as a plugin too. Creative use of widget codes in the
gadgets makes the blog look inviting and neat.
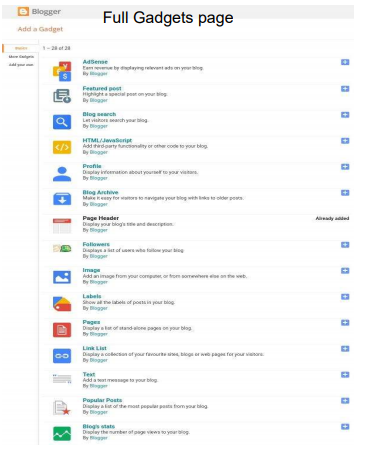
For example, if you want to add an image in your side,
you will login to your dashboard, go to layout, click
add gadget in the area you want to add the picture, it
will popup the gadget area like this
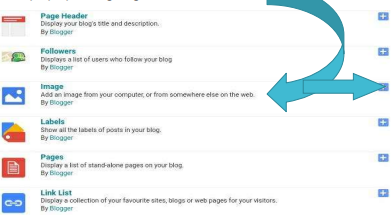
scroll down, click on the + in front of the image,
choose the image and add, click save. Done!
5 BEST LINK SHORTENER TO EARN MONEY ONLINE IN 2019
Setting up Standalone Pages: Hope there is no problem so far. Good! Here I will teach you how to create stand-alone pages.
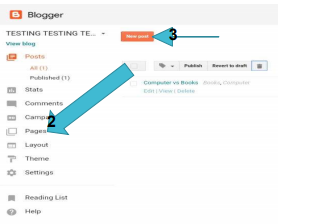
Step one:Login to your dashboard
Step two:click on pages
Step three:Click on add new page
Step four:Type in the contents, give the title and then publish. So simple!
How To Add pages to Navigation menu: Go to the menu gadget in the layout, click edit, add a page
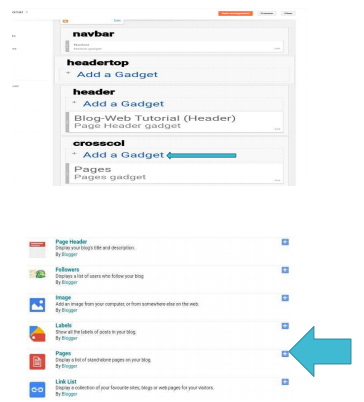
When you click on add page, you should see this
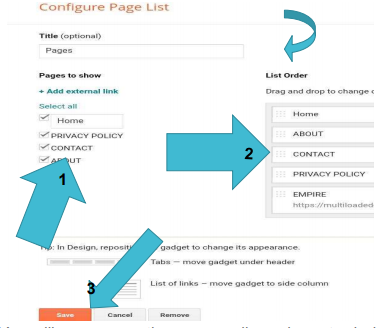
You will see your active pages, all you have to do is
mark/select the ones you want to make public.
You can also add pages in your sidebar. Click add a gadget, scroll down and select add pages, select and
save as the above instruction. Done Usually, some templates have menu sections for
pages and categories.
To link to external/internal pages in your page menu,
click on add external link in the diagram above, add
the address and title, mark as part of the pages and
save.
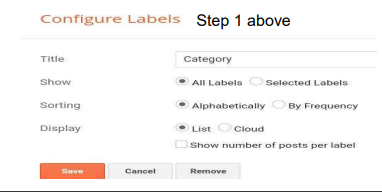
How to add post categories/labels to navigation bar: You must have seen bloggers have their categories/labels in the navigation bar and wondered how you too can, well it's simple. Keep reading.
Step one:First Add your post categories/labels in the sidebar. In chapter five, I shall dwell more on how to add labels to post. Go to layout, click on add gadget, select blog categories, give it a title and save. Now view your blog in another window.
Step two:Go to your layout, then click edit on the menu gadget (depending on the layout of the template you are using). When you click edit, you should see a page like a diagram above where you can add links to label/categories.
Step three:click on add link to an external site. Now go and view your blog, go to the category section you have created, right click or long press on the category/label you want to use, copy the URL and go back to add it in the external link. Write the name of the category/label (say Entertainment) and then save. Boom! you are done. You can do that for as many categories/labels you want.
NOTE: Some templates, especially those from godyabitemplate, have two menu areas in the header section. One for Pages(Home, About, Contact, Privacy, Disclaimer) while the other is meant for categories/labels. To set them up, use the same steps highlighted above.
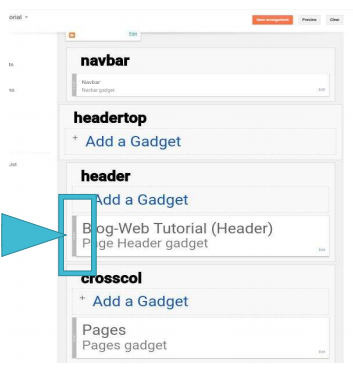
How To Arrange blog layout: Proper arrangement of
gadgets in the blog layout also adds to the blog look and
easy navigation by visitors. Endeavor to arrange your
sidebars to make it easy for your visitors to navigate.
Gadgets that should be on sidebars: Search, Subscription, Facebook page, Blog categories/labels, Recent posts, and Popular post.
Gadgets that should be in the footer: Some categories/labels, Sitemap, Pages and blog attribution (Copyright 2019, blog-Web Tutorial). Some templates automatically add that. and then, social networks e.g Twitter, Facebook, IG, etc. Some templates have sections where you can add AdSense codes. It is an added advantage. You can only move one gadget from one side to the other e.g Left to Right, Up or Down, etc using your laptop or desktop device. To move it, place your cursor on the doted area of the particular gadget you want to move double-click on it, and then drag it to your desired place. After that, make sure you save the arrangement at the top right-hand corner of the layout page. Well done!
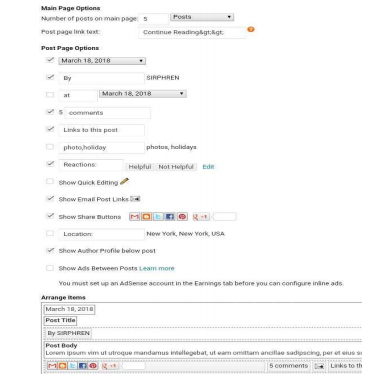
Setting up Home view: Your home view displays number of post, date, and author, sharing buttons, Reactions etc. When you want to edit your blog home view, go to your layout and locate the gadget. In some template. it has the widest width and usually under the header gadget. Set the number of post per page you want, author, Reactions, author profile, sharing button and then save. If you have not been approved for Adsense, don't click on show ads on the home page. Then save your changes.
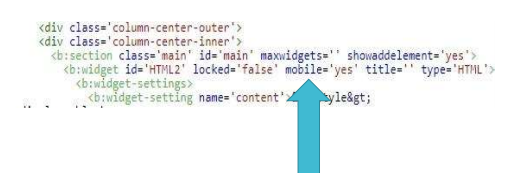
Setting up Mobile view/template: You will see that some gadgets will not show in your mobile view. How do you solve this? It's simple, read on. Take note of the gadget(s) you want to display on your mobile view.
Warning: Make sure you backup your blog template in case something unexpected happens.
Step One:Log in to your dashboard
Step two:Click on theme/template whichever the case
Step three:Click on edit HTML
Step four:search for the gadget by navigating to it through JUMP to the gadget.
Step Five:Add mobile='yes' Immediately after false, give a space and then add the code.
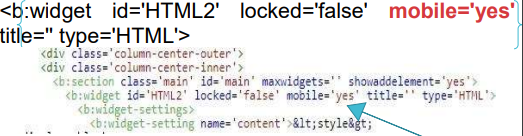
Do this for as many Gadgets as you want. Then save the theme. If there is anything wrong with the code, you
will see a notification right above the HTML frame. If
you want the gadget to display only on mobile, add
mobile='only' instead. Make sure you click save
theme before closing the page.
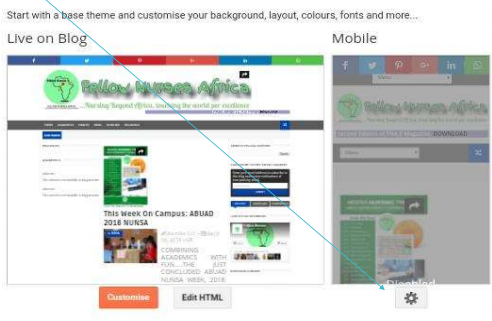
Go back to the theme section in the dashboard. You will see a setting icon below the mobile view, click it
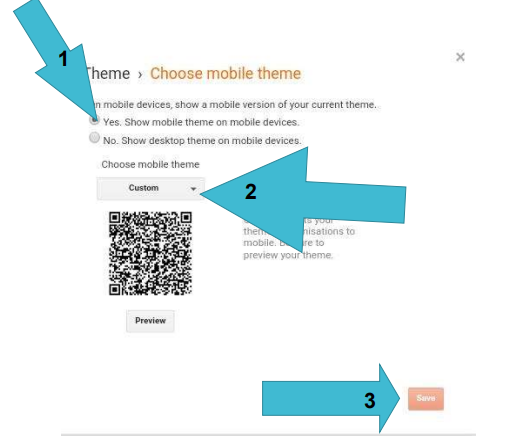
Step Seven:
Select show mobile view on mobile. In the drop-down area, click it, scroll down to select Custom, then save your settings. Well done! You should see your gadgets in the mobile view now.
Making First Post: Now that you have set up the blog, it is time to make your debut post. There are two ways to publish your posts. 1) You can use blogger App 2). You can use the browser, which is the best.
Tips on Publishing post: Go to your dashboard, click on Post, on the page it brings up, click on add new post. It will bring up a Microsoft-like page. If you know know how to use Microsoft, you sure can make you the post looks inviting.
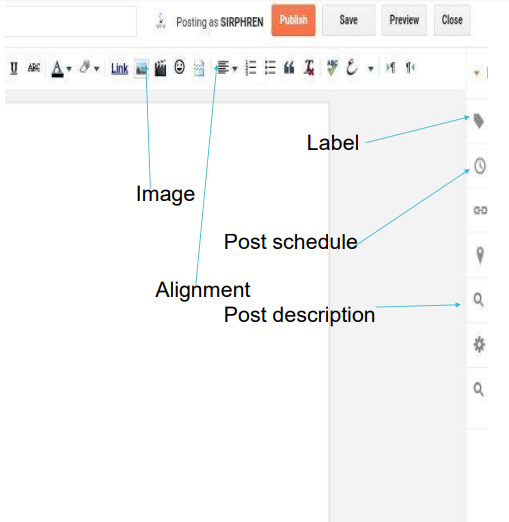
Some of the icons are for. 1) - Bolding 2) - Italicize 3) - Image 4) - Audio 5) - video 6) - Quotation 7) - label 8) - description 9) - HTML text 10) - Post alignment
What you must do: After finishing typing your article, Post title, align, Set the label, Set the post description, and publish. Boom! Your post is ready on the internet. See how the page looks like below
Driving traffics to your blog: The joy of every blogger is to get tons of traffics to his blog. Who wouldn't want high traffic? lolz. In the blogosphere, there are some ways to get traffic to your blog, some are paid some are not. Some of the ways are;
Social Networks: Social networks such as Facebook, twitter, Google+, Stumbleupon, Reddit, etc are some of the best ways to get traffic to your blog. What you need to do is just to get signed up in some of these networks and make sure your posts are shared there. As your friends or followers login, they will see your blog post. If your post is engaging, they will be prompt to share with others. Other than just sharing publicly on these networks, you can also share to subgroups that are related to the post topic.
Forums: Online forums are one of the best places to share blog posts. Forums are subsections to various niches. Your job is to sign up and make sure to share your blog post to forum sections that are related to your blog post title.
Offline broadcast: You may think this is not necessary but it is. Whenever you anchor a program or present in any place, it will be wise to talk to your audience about your blog and what they can gain from it. Tell your neighbors about it, and you won’t be surprised to see some of them checking on it. When you run into an old pal, tell him about your latest development. Etc
2 Best Ways to Earn Money Online
Paid Advert: You can also get traffic to your blog via a paid advert on other blogs, advertising agent, forums, and social networks. You can pay to advertise your post, website on facebook as low as N200 per day. Just have to create a page for your blog and get on with it. You can also pay on other forums or blogs to advertise yours. Some services may charge you monthly or weekly depending on your budget. To learn how to advertise on mine. Apart from the paid advert, you can exchange ads with fellow bloggers that have a niche different from yours. That is, you put his banner on yours, he does the same for you. You can also place your blog feed on blogs that have a niche closer to yours. If you run a nutrition blog or you would like to introduce your audience to health articles, contact me and lets exchange. Have related posts widget in place: Design you're a blog such that after a visitor finishes a post, he/she will be prompted to read the related post which brings about increase in your page view. Visit my tutorial blog or multiniche blog to check. Put in place sharing button: Let your sharing buttons be at the top and below your posts. When you finish a post, urge your visitors to share with friends on their favorite social networks.
Blog subscribers: Subscription is a good thing. Place a subscribe to my blog widget, very close to the end of your article so that your visitors can be tempted to after reading a post they will like to read again. As soon as they subscribe, make sure you greet them via email and send blog updates to them every other day or weekly. You can also place your blog feed on blogs that have a niche closer to yours. If you run a nutrition blog or you would like to introduce your audience to health articles, contact me and lets exchange.
Have related posts widget in place: Design you're a blog such that after a visitor finishes a post, he/she will be prompted to read the related post which brings about increase in your page view. Visit my tutorial blog or multiniche blog to check.
Put in place sharing button: Let your sharing buttons be at the top and below your posts. When you finish a post, urge your visitors to share with friends on their favorite social networks. Also, when a visitor asks a question in the comment, make sure it is responded to. See a post on my blog here.
How To Rewrite An Article Through Some Fruitful Rewriting Strategies?
Be consistent: If you are running a blog, you should be consistent in publishing your posts. If you are not a news or media blog, find some days in the week to be updating your blog posts such that your visitors will know when to find new posts to refresh their brain with.
How to add forum To Your Blog: If you are operating a blog on a product where your visitors cannot do without asking about your products or you want to add a place where your visitors can drop their questions and get answers by you and other visitors, you need a forum. Even with having a blog on Blogspot, you can still, have a forum. To learn how to create and add a forum to your blogger blog.
How To Monetize Your Blogger Blog: In blogging, there are various ways to make money out of it. The most popular one is Google Adsense (I will be including how to make your blog ready for Adsense on my blog later on. But, till then, get your blog traffic high.) But apart from it, there are gazillions of alternatives. Such as media.net, taboola, content.ad, NG adverts, Outbrain, MGID, etc I shall be writing exclusively on them soon. Stay connected by subscribing to my blog (this or this). Apart from signing up on these ad networks, you can monetize your blog via:
1). Affiliate market: Affiliate marketing is a form of blog monetization whereby you place the banner of whatever company you are affiliated with on your blog. When your visitor clicks the ad and buy from such a company or perform a particular action, you earn a certain percentage. Meanwhile, the price of such a product is not affected. Examples are; Amazon, Konga, Jumia, Ajebo market, mobile, etc. If your blog involves product review, you will do well by using affiliate networks that correlate with your blog.
2). Private ads: These are ads from companies, seminar, products, etc that you and the company agreed on to place their banners on your blog based on how you decided to charge them. See a sample of my advertising with us page here.
3). Sponsored article/posts: Some people are good writers but do not have a blog. They only need bloggers to help them give their articles online presence. This is also a form of monetization. You charge them base on how you wish.
4). Text ads: These are ads that are linking directly to a particular product or article on another website. These ads are usually added above or below the blog post. Charge them depending on the duration of advertising. This is even cool as it will not take much space on your blog.
5) RSS feed posts: RSS feed is a form of advertisement you can place on your blog to display posts(usually 5) from another blog. On my blog, I accept RSS feeds of blog on a music download, health, Nutrition, Food and book review.
HOW TO USE CUSTOM DOMAIN
Now that you have basic knowledge of creating and
owning free domain blog on Blogspot, lets quickly talk
about how to use a custom domain
(www.yourblogname.com) on your blog.
Things to take note of before choosing your domain:
1) Choose a name that is short and easy to
remember by your visitors
2) No hyphens
3) Easy to say and spell
4) Use keywords
5) Use .com domain. Internet users are accustomed
to.com
6) You may consider using your name. you never can
tell, your name may in future be the talk of the
town. Your domain will say much about you and
your brand, choose it wisely.
how to connect it to your blog.